Theme Information
Theme version: 5.2.0
WordPress version: 6.3.2
Created: 24 August 2015
Updated: 03 August 2024
We would like to thank you for purchasing Adventure Tours WordPress theme. We hope that your experience using Adventure Tours will be pleasant and that it brings a lot of success to your business!
Install and Set Up Theme
Install WordPress
In order to install WordPress, please follow the detailed instructions in WordPress official codex.
Install Theme
After installing WordPress, you can start installing the theme.
Extract the zipped package downloaded from ThemeForest into your chosen folder. In the extracted package there is a file adventure-tours.zip which is the zipped theme.
There are two ways of installing the theme -- via WordPress admin panel or via FTP.
Admin Panel
In WordPress admin panel in the left sidebar, go to Appearance > Themes and on top of the page press Add New. On the opened page press Upload Theme, selectadventure-tours.zip, and press Install Now. Once your theme is installed, you should see an Activate link. Click on it. Hurrah! Adventure Tours theme is now successfully activated.FTP
Using FTP, extract theadventure-tours.zipfile and upload the extracted folder to/wp-content/themes/folder on your server. To activate the theme, in admin panel go to Appearance > Themes, find Adventure Tours thumbnail, hover over it and press Activate. Adventure Tours theme is now successfully activated.
Plugins
You should see a notice on top of the WordPress admin panel (if you do not have these plugins activated yet) to install plugins. This notice will send you to Appearance > Install Plugins section where you can install them.
To use the tours functionality, it is a requirement to install Data types for Adventure Tours theme and WooCommerce plugins. Slider Revolution, Contact Form 7, and MC4WP: Mailchimp for WordPress are recommended plugins but are not required to run the theme.
For more information on these plugins and how they are used in the theme, see here.
To use the tours functionality, it is a requirement to install Data types for Adventure Tours theme and WooCommerce plugins.
Permalinks
To make your page links SEO-friendly, go to Settings > Permalinks, select Post name, and press Save Changes.

Import Demo Data
When you have installed the required plugins and updated the permalinks, now you can import the demo data. You will need to use a custom Adventure Tours Importer. Go to Tools > Adv. Tours Import and install the Wordpress Importer plugin (there will be a notice on top asking for installation). When you have the plugin installed, start checking the boxes of the demo data that you would like to import. Then click Start. Now the data are imported! Please note that images and widgets cannot be imported.
To make your website look as in our demo, please follow the instructions on setting up Menus, Home and Blog pages, and importing Revo Slider.
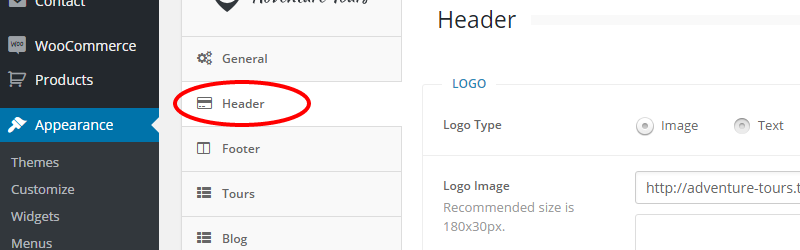
Header
All settings related to header can be found at Theme Options > Header. To set up social profiles, go to Theme Options > Social Media. For setting up a header menu, see below.
Footer
All settings related to footer can be found at Theme Options > Footer. You can set up whether to show two, three, or four columns of widget areas. Instructions on how to set up widget areas, see here. For setting up a footer menu, see below.
Menus
Before setting up menus, it is good to add some content, such as different pages, blog posts, tours, etc.
When you are ready to set up menus, follow the steps below:
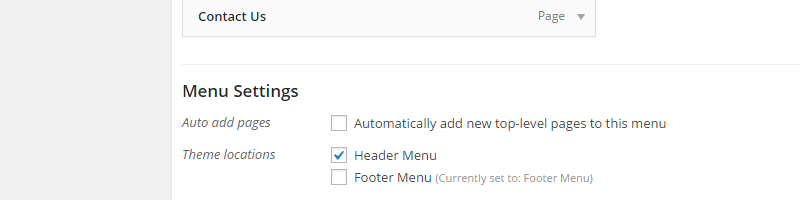
- Go to Appearance > Menus, enter a menu title into the Menu Name field, e.g. Header Menu, and press Create Menu.
Start dragging and dropping menu items from the left sidebar to the right Menu Structure area. Under Menu Settings check an area on the website where to show the menu, e.g. Header Menu. There is a total of two menu areas in Adventure Tours -- one in the header and one in the footer. Press Save Menu.
To create another menu, click on the top create a new menu link and repeat the Step 2.
Widget Areas
There is a total of eight widget areas available in Adventure Tours:
- Sidebar (located on blog related pages)
- Shop Sidebar (located on shop related pages)
- Tour Sidebar (located on tours related pages)
- FAQs Sidebar (located on the FAQs page)
- Footer1, Footer2, Footer3, Footer4 (located in footer)
Note that most widgets require some content to have on your site. So it is good to add some content before setting up widget areas (e.g. different pages, blog posts, tours, etc.).
When you are ready to set up widget areas, go to Appearance > Widgets and start dragging and dropping widgets from the left to the right widget boxes.
There are WordPress built-in widgets, widgets supplied with installed plugins as well as custom Adventure Tours widgets. There is four of them:
- AdventureTours: Contact Us (allows displaying your contact information with icons for address, phone, mobile phone, email, and Skype)
- AdventureTours: Latest Posts (allows displaying recent posts, the difference from the WordPress built-in Recent Posts widget is that the post thumbnails are also shown)
- AdventureTours: Tours (allows displaying tour boxes with various styling)
- AdventureTours: Twitter (allows displaying tweets from your Twitter profile)
Home Page
If you do not have Home page yet, you can create one at Pages > Add New. Then go to Settings > Reading and check A static page (select below) radio button for Front page displays. For Front page, select your Home page from the drop-down and press Save Settings button.

Instructions on how to make your Home page look as in our live demo, please see here.
Blog
As with Home page, you can create a blog page at Pages > Add New if you don't have one yet. Then go to Settings > Reading and check A static page (select below) radio button for Front page displays. For Posts page, select your blog page from the drop-down and press Save Settings button.
There are some settings for Blog available at Appearance > Theme Options > Blog. To set up social sharing buttons, go to Appearance > Theme Options > Social Sharing. There are also WordPress built-in blog settings that can be found at Settings > Reading and Settings > Discussion. Please note that some of these settings will be also applied to Tours and Shop.
Tours
To create and manage tours, you should first install the required plugins.
Create a Tour
- Go to Products > Add Product.
- Enter tour title in the Product name field and write down tour description in the text editor area below.
- In the Header Section, select if you want to add a full screen image or a slider to the tour details page.
- In the Tour Data box, you can select a badge to attach and add more tabs with content.
- In the Product Data box next to the title select Tour from the select box. Only General, Attributes, and Tour Booking tabs apply to tours.
Under General, enter tour regular price and a sale price if applies.
Under Attributes, set up attributes that are shown on top of the tour details page.
Under Tour Booking, you can set up tour dates. - In the right sidebar, you can set up tour tags, featured image, product gallery, and tour categories. Please ignore Product Categories which are used for products.
- Press Publish button.
Note that setting up header image does not equal to setting up featured image that shows in all shortcodes and widgets.
Tour Badges
Use a tour badge if you want to attract visitors attention to a tour. It appears as a circle on the tour details page and as a badge in shortcodes and widgets.
- Set up tour badges at Appearance > Theme Options > Tours > Tour Badges. There is a total of three badges available. You can enter a title and select a color for each of them. Press Save Changes button.
- On the tour editing page, select a badge in the Tour Data box.
Tour Attributes
- Add new attributes at Products > Attributes. Enter required fileds and choose an icon for the attribute. For a complete list of icons, see here. Press Add Attribute button.
- Next to the attribute name, press Configure terms button to set up attribute values.
- On the tour editing page, click on Attributes tab in the Product Data box. In the select box, you should see attributes that you added on the Step 2. Tick the checkbox if you want the attribute to appear on the product details page. Unchecked attributes can still be used for search. After you set up all attributes, press Save attributes button.
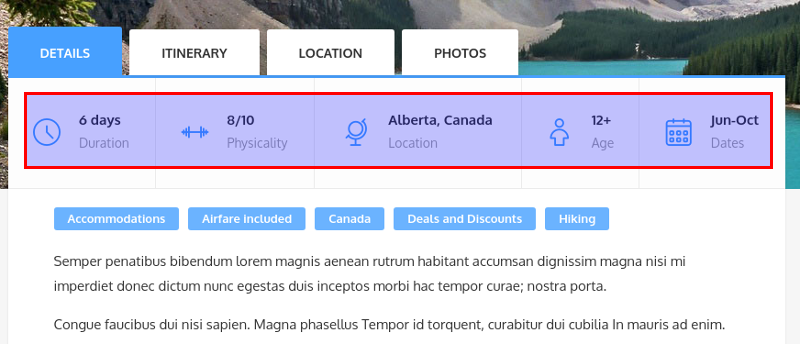
- Go to Appearance > Theme Options > Tours > Tour Details Page > Top Section Attributes and select attributes that will be displayed on the tour details page. You can set up a specific order by dragging and dropping the items. Press Save Changes button.
Example of top these attributes on tour details page is provided on image below:
Tour Categories
To use tour categories functionality, it is a requirement to install Data types for Adventure Tours theme and WooCommerce plugins.
Tour categories help organize tours and create structure.
- Add categories at Products > Tour Categories. Enter name, set up an image and select an icon. (For a complete list of icons, see here.) You can create tour categories hierarchy by selecting a parent. in Display Mode select box, you can choose which items to show on tour categories page. Press Add New Category button.
- On the tour editing page, select categories in the Tour Categories box.
Tour Dates
To set up dates for a tour, follow these steps:
- On the tour editing page, go to Product Data box and click on the Tour Booking tab.
Press Add Period button. If the tour is regular, then select a start and an end date for the tour period. Checking days of the week means that tour runs every week starting on the checked days. If the tour is one time, then the start and the end date should be the same, meaning that tour runs only once on the selected date. However, you still need to check the day of the week on which the start date falls. Enter the number of tickets per tour. You can set up several periods. Press Save button.
Setting up tour dates is explained with the following four examples:
- You have a tour which runs every Saturday during fall 2015. For the start date select 09/01/2015 and for the end date select 11/30/2015. Check Saturday, enter number of tickets, and press Save.
- You have a tour which runs every day during the 2016 year. For the start day select 01/01/2016 and for the end date select 12/31/2016. Check all days, enter number of tickets per day, and press Save.
- You have one time tour that starts on 12/01/2015. For the start date select 12/01/2015 and for the end date select 12/01/2015. Check Tuesday, enter number of tickets, and press Save.
- You have a tour which runs last Saturday every month during winter 2015/2016. You should add three periods:
- 12/26/2015 for the start date and 12/26/2015 for the end date, enter number of tickets, and check Saturday;
- 30/01/2016 for the start date and 30/01/2016 for the end date, enter number of tickets, and check Saturday;
- 27/02/2016 for the start date and 27/02/2016 for the end date, enter number of tickets, and check Saturday.
Press Save.
- Set up earliest and latest booking time for tours at Appearance > Theme Options > Tours > Booking Form. For example, you would like to enable the booking not earlier than half a year before the tour starts. Then enter 180 for Earliest Booking Time. Also, you may need to disable the booking a week before the tour starts. Then enter 7 for Latest Booking Time. Press Save Changes button.
Tours Page
- Add a new page at Pages > Add New.
- At Appearance > Theme Options > Tours > Tours Page select the page you created on the Step 1.
- Choose whether to display categories, tours, or both on the tours page in Tours Page Display. Press Save Changes button.
- To set up widgets in the right sidebar of all pages related to tours, go to Appearance > Widgets and drag and drop widgets on the left to the widget area called Tour Sidebar on the right.
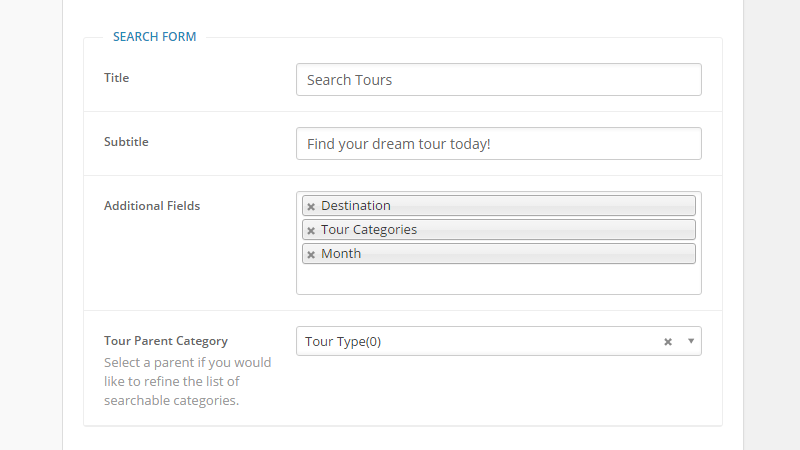
Search Form
A search form is always displayed on the tours page. You can also output it with Tour Search Form shortcode. Tour attributes and categories are used as search fields.
To set up the search form, go to Appearance > Theme Options > Tours > Search Form. Enter title, subtitle, and select search fields. Press Save Changes button.
NOTE: Since version 2.2.0, options for filtering by price and dates are available. If you would like to use these features, it's strongly recommended that you have a cache plugin that provides object cache storing, in order to prevent extra loading for your server which is caused by filtering by dates.
Other Settings
To set up other tour settings, go to Appearance > Theme Options > Tours.
Shop
To set up and manage shop, you should first install WooCommerce plugin.
When you have WooCommerce plugin installed, pages such as Shop, Checkout, Cart, and My Account are created automatically and can be found at Pages > All Pages. For detailed documentation on WooCommerce, please go here.
Create a Product
- To create a product, go to Products > Add Product.
- Enter product name and write down product description in the text editor area below.
- In the Header Section, select if you want to add a full screen image or a slider to the product details page.
- In the Product Data box, you can set up the following:
Under General, enter product regular price and a sale price if applies. You can also set up a unique SKU identifier.
Under Inventory, tick the Manage stock checkbox if there is a limited number of products available and set up other stock-related information.
Under Shipping, enter information related to the product size and shipping. Under Linked, you can group the product with other products.
Under Attributes, set up attributes.
Under Advanced, you can add some additional settings.
If you are not sure about what the field is for, there is a question mark next to the field. Hover on it, and a tooltip with explanation appears. - If there is a product variation, e.g. color or dimension, select Variable product in the select box next to the Product Data title. A new tab called Variations appears. Before adding variations, you should first set up attributes.
- On the right, you can set up tags, featured image, product gallery, and product categories.
- Enter a short product description into Product Short Description box.
- Press Publish button.
Tour Data and Tour Categories boxes do not apply to products.
Set Up a Widget Area
There is a widget area that displays on all product related pages. To set it up, go to Appearance > Widgets and drag and drop widgets on the left to the widget area called Shop Sidebar on the right. WooCommerce provides a total of 11 widgets that you can choose from.
Custom Pages
Home Page
Instructions on how to create and set up Home page, please see here.
To make your Home page look like in our live demo, you should have the following content ready:
- Tours
- Tour categories and subcategories (parent category Destination and child categories of destinations, parent category Tour Type and child categories of tour types)
- Tour search form
- At least one blog post
- At least two tour reviews
- Mailchimp plugin installed and a Mailchimp list ready
- Slider Revolution plugin installed and a slider ready
Steps on how to make your Home page look like in our live demo are described below:
- Open your Home page for editing (go to Pages > All Pages, find the page and click on Edit link under the title).
The content of Home page is mostly created with shortcodes. Copy the contents of this file and paste it into the page body. The structure of the page is represented below (do not copy it):
 [row]
     [column width="9/12"]
         [title]
         some text content
         [icons_set row_size="3"]
             [icon_item icon="td-earth-1" title="Diverse destinations"]
             [icon_item icon="td-banknote-1" title="Best prices"]
             [icon_item icon="td-photocamera-5" title="Beautiful places"]
             [icon_item icon="td-calendar-2" title="Fast booking"]
             [icon_item icon="td-chat" title="Instant help"]
             [icon_item icon="td-heart" title="Emotional travel"]
         [/icons_set]
     [/column]
     [column width="3/12"]
         [tour_search_form title="Search Tours" note="Find your dream tour today!"]
     [/column]
 [/row]
 [tour_carousel]
 [tours_grid]
 [tour_category_images]
 [tour_category_icons]
 [row]
     [column width="6/12"]
         [latest_posts]
     [/column]
     [column width="6/12"]
         [tour_reviews]
     [/column]
 [/row]
 [mailchimp_form]
There is need to modify some of these shortcodes:
Highlight the following shortcode:
[tour_carousel title="Most Popular Tours" title_underline="off" sub_title="Take a Look at Our" description_words_limit="7" bg_url="" arrow_style="light"]On the top toolbar click on the shortcode icon and in the drop-down click Edit. In the popup window, choose your own background image as well as update other fields to your needs.
Highlight the following shortcode:
[tours_grid title="Deals and Discounts" title_underline="on" sub_title="Sagittis vulputate magna sagittis sagittis erat feugiat nullam cubilia amet dignissim Euismod." btn_more_text="View more" btn_more_link="/demo/tour-category/deals-and-discounts/" price_style="highlighted" description_words_limit="7" tour_category="deals-and-discounts" number="4"]On the top toolbar click on the shortcode icon and in the drop-down click Edit. In the popup window, set up your own
btn_more_linkas well as update other fields to your needs.Highlight the following shortcode:
[tour_category_images title="Destination" title_underline="on" sub_title="Find a Tour by" parent_id="126" ignore_empty="on" css_class="section-white"]On the top toolbar click on the shortcode icon and in the drop-down click Edit. In the popup window, set up your own
parent_idas well as update other fields to your needs.Highlight the following shortcode:
[tour_category_icons title="Tour Type" title_underline="on" sub_title="Find a Tour by" parent_id="" bg_url="" ignore_empty="on"]On the top toolbar click on the shortcode icon and in the drop-down click Edit. In the popup window, set up your own
parent_idand select your own background image as well as update other fields to your needs.Highlight the following shortcode:
[mailchimp_form form_id="1" title="Join the Newsletter" button_text="Subscribe" width_mode="full-width" bg_repeat="repeat" css_class="stick-to-bottom" bg_url=""]To receive our best monthly deals[/mailchimp_form]On the top toolbar click on the shortcode icon and in the drop-down click Edit. In the popup window, set up your own
form_idand select a background image as well as update other fields to your needs.
- In the Header Section box select Slider and in the drop-down select your slider.
- Press Update button.
Now your Home page is ready!
Contact Page
To make your Contact page look like in our live demo, you should have the following content ready:
Steps on how to make your Contact page look like in our live demo are described below:
- Create a new page at Pages > Add New and enter a page title.
Copy contents of this file and paste it into the page body. The structure of the page is represented below (do not copy it):
 [row]
     [column width="6/12"]
         [title]
         some text content
         [contact_info]
         [social_icons]
     [/column]
     [column width="6/12"]
         [title]
         [contact-form-7]
     [/column]
 [/row]
 [google_map]
There is need to modify some of these shortcodes:
Replace the following shortcode:
[contact-form-7 id="162" title="Contact Us"]With a shortocode of your own custom form that can be found at Contact > Contact Forms.
Highlight the following shortcode:
[google_map coordinates="37.7919688,-122.4243583" zoom="10" height="400" width_mode="full-width" css_class="stick-to-bottom"]On the top toolbar click on the shortcode icon and in the drop-down click Edit. In the popup window, set up your own Google map. For information on Google Map shortcode, see here.
In the Header Section box select Image. Enter a subtitle, select a background image, and check to use parallax.
- Press Publish button.
Now your Contact page is ready!
FAQs Page
To use the FAQs functionality, it is a requirement to install Data types for Adventure Tours theme and WooCommerce plugins.
To create a FAQs page, follow the steps below:
- Go to Pages > Add New, enter page name, and on the right in the Page Attributes box select FAQ in the Template select box. Press Publish button.
- Start adding questions at FAQs > Add New Question. Title field is question body and text editor area is answer to the question. Add question to a category in the FAQ Categories box on the right. Press Publish button.
- Go to Appearance > Theme Options > FAQs Page. You can show or hide the question form and set up email to which the questions from users should be sent.
Gallery Page
To create a Gallery page, follow the steps below:
- Go to Pages > Add New and enter a page title.
- Above the text editor area press Add Media button. In the popup window on the left, click Create Gallery and select images for the gallery. Press Create a new gallery and Insert gallery.
- You can group images by adding them into Media categories. Go to Media > Media Categories and add a new category. After that, go to Media > Library and click Edit on images which you want to add to categories. On the image editing page, tick the relevant categories in the Media Categories box and press Update button.
- Switch to Text mode to customize the gallery by adding attributes.

There are two attributes available:
- pagination with values on/off (if on, then 9 images per page are displayed, if off, then all images are displayed on the same page)
- filters with values on/off (if on, then categories as filters will be displayed on top of the page).
Modify the shortcode so that it looks as following:
[gallery pagination="on/off" filter="on/off" ids="your custom IDs"]
Shortcodes
To use shortcodes functionality, it is a requirement to install Data types for Adventure Tours theme and WooCommerce plugins.
A shortcode is a WordPress-specific code that lets you embed HTML code that would normally require lots of complicated code with very little effort. When you edit a page, shortcode looks as following:
[shortcode_name attribute1="value1" attribute2="value2"]
There are over 20 custom shortcodes in Adventure Tours. You can also use WordPress built-in shortcodes as well as shortcodes provided by installed plugins, like WooCommerce or Revo Slider.
Shortcodes can be inserted into a post or page body. On the top bar above the text editor area, there is a Shortcodes icon. Click on it and select a shortcode.
![]()
If you want to modify an existing shortcode in the post body, then highlight the shortcode and in the Shortcodes menu select Edit.
The following shortcodes are included with Adventure Tours:
- Columns
- Typography
- Tables
- Tours
- Contact
- External Services
- Other
Columns
NOTE: if you are using WPBakery Page Builder plugin you should use [vc_row] and [vc_column] shortcodes instead of this one.
Columns shortcode allows dividing content into columns.
[row css_class="white_section"]
    [column width="6/12"]Column #1[/column]
    [column width="6/12"]Column #2[/column]
[/row]
Attributes
Row attributes are as following:
- css_class: CSS class
Column attributes are as following:
- width: fractional number (denominator is always 12, numerator is a number from 1 to 11)
Examples
- If you want a four column layout with all columns of equal width:
[row] [column width="3/12"]Column #1[/column] [column width="3/12"]Column #2[/column] [column width="3/12"]Column #3[/column] [column width="3/12"]Column #4[/column] [/row] - If you want a two column layout with one column of 9/12 and another of 3/12 of total width:
 [row]
     [column width="9/12"]Column #1[/column]
     [column width="3/12"]Column #2[/column]
 [/row]
Title
Title shortcode allows adding titles with various styling.
[title text="Most Popular Tours" subtitle="Take a Look at Our" size="big" position="center" decoration="on" underline="on" style="dark"]
Attributes
Title attributes are as following:
- text: text
- subtitle: text
- size: big/small (applies to title size)
- position: left/center
- decoration: on/off
- underline: on/off
- style: dark/light (applies to color of title, subtitle, and underline)
- css_class: CSS class. Available since Data types for Adventure Tours theme plugin version 1.1.3.
Icon Tick
Icon Tick shortcode is an icon with two states of green tick or red cross. It allows better presentation of list information, i.e. which items are included or which items are excluded.
[icon_tick state="on"]
Attributes
Icon Tick has the following attributes:
- state: on/off (whether to show green tick or red cross)
- css_class: CSS class. Available since Data types for Adventure Tours theme plugin version 1.2.0.
Button
Since Data types for Adventure Tours theme plugin 1.0.4.
Button shortcode allows create button element.
[at_btn text="GO!" url="http://example.com"]
Attributes
- text: button text
- url: url address
- type: link/link in a new tab/button/submit. Type "link in a new tab" available since Data types for Adventure Tours theme plugin version 2.1.7.
- style: default/primary/secondary1/secondary2
- size: default/medium/small
- corners: default/rounded
- light: off/on
- transparent: off/on
- icon_class: class for icon element
- icon_align: left/right
- css_class: CSS class
Adventure Tours Icon
Since Data types for Adventure Tours theme plugin 2.1.0.
Allows insert icons defined in the theme.
[at_icon icon="td-user"]
Attributes
- icon: class of the icon element
- css_class: CSS class
Table
Table is not exactly a shortcode, but rather an HTML table that is inserted right into the post body.
Attributes
Table has the following attributes:
- rows: number
- cols: number (of columns)
- css_class: CSS class (you might want to attach to the table)
Tour Table
Tour Table is not exactly a shortcode, but rather an HTML table that is inserted right into the post body. Unlike the previous shortcode Table, it does not have vertical borders.
Attributes
Tour Table has the following attributes:
- rows: number
- cols: number (of columns)
- css_class: CSS class (you might want to attach to the table)
Tour Search Form
Tour Search Form shortcode allows putting a tour search form into a post or page body. Instructions on how to set up a search form, please see here.
[tour_search_form title="Search" note="best tours!" css_class=""]
Attributes
Tour Search Form has the following attributes:
- title: text
- note: text ( text for the sub title element )
- hide_text_field: on/off
- css_class: CSS class
Tour Search Form Horizontal
Since Data types for Adventure Tours theme plugin 1.1.0.
Tour Search Form Horizontal shortcode allows putting a tour search form into a post or page body like Tour Search Form but renders form in a horizontal mode instead of vertical one.
[tour_search_form_horizontal title="Search" note="best tours!" css_class=""]
Has same settings as Tour Search Form shortcode.
Tour Category Images
Tour Category Images shortcode allows placing a carousel of tour categories. Each category is represented with an image and a title. If there is four or less categories, then the carousel navigation arrows won't show. Instructions on how to add tour categories, please see here.
[tour_category_images title="Destination" title_underline="on" sub_title="Find a Tour by" parent_id="126" ignore_empty="on" css_class="section-white"]
Attributes
Tour Category Images has the following attributes:
- title: text
- title_underline: on/off
- sub_title: text
- parent_id: ID of parent category
You should use this attribute if you want to show subcategories from a certain category. To get the ID, go to Products > Tour Categories, on the right click Edit under the needed category, and then in the URL of the opened page look for&tag_ID=126, the number is the ID) - category_ids: set of particular category ids separated by comma
- slides_number: number of elements that should be renderd on one "page". Available since Data types for Adventure Tours theme plugin version 1.1.4.
- number: number of items to show
- autoplay: number of seconds for items auto sliding. Available since Data types for Adventure Tours theme plugin version 2.1.3.
- ignore_empty: on/off (whether to show or hide the carousel if no categories exist)
- css_class: CSS class
- orderby: name/id/slug/count/term_group/category__in (attribute that should be used during items sorting)
- order: ACS/DESC (sorting direction)
Tour Category Icons
Tour Category Icons shortcode allows placing a carousel of tour categories. Each category is represented with an icon and a title. If there is five or less categories, then the carousel navigation arrows won't show. Instructions on how to add tour categories, please see here.
[tour_category_icons title="Tour Type" title_underline="on" sub_title="Find a Tour by" parent_id="118" bg_url="http://adventure-tours.themedelight.com/wp-content/uploads/2015/07/mountain-690104_1920.jpg" ignore_empty="on"]
Attributes
Tour Category Icons has the following attributes:
- title: text
- title_underline: on/off
- sub_title: text
- parent_id: ID of parent category
You should use this attribute if you want to show subcategories from a certain category. To get the ID, go to Products > Tour Categories, on the right click Edit under the needed category, and then in the URL of the opened page look for&tag_ID=126, the number is the ID) - category_ids: set of particular category ids separated by comma
- slides_number: number of elements that should be renderd on one "page". Available since Data types for Adventure Tours theme plugin version 1.1.4.
- number: number of items to show
- autoplay: number of seconds for items auto sliding. Available since Data types for Adventure Tours theme plugin version 2.1.3.
- bg_url: image URL (image displays on the carousel background)
- ignore_empty: on/off (whether to show or hide the carousel if no categories exist)
- css_class: CSS class
- orderby: name/id/slug/count/term_group/category__in (attribute that should be used during items sorting)
- order: ACS/DESC (sorting direction)
Tours Carousel
Tours Carousel shortcode allows placing a carousel of tours. If there is three or less items, then the carousel navigation arrows won't show. Instructions on how to create tours, please see here.
[tour_carousel title="Most Popular Tours" title_underline="off" sub_title="Take a Look at Our" description_words_limit="7" tour_ids="114,132,128,134,126" bg_url="http://adventure-tours.themedelight.com/wp-content/uploads/2015/07/most-popular-bg.jpg" arrow_style="light"]
Attributes
Tours Carousel has the following attributes:
- title: text
- title_underline: on/off
- sub_title: text
- description_words_limit: number of words of tour description to display
- tour_category: category slug
You should use this attribute if you want to show tours from a certain category. To get the slug, go to Products > Tour Categories, on the right click Edit under the needed category, and then on the opened page copy the slug. - tour_category_ids: tour category ids separated by comma
You should use this attribute if you want to show tours from specific category or categories. To get the category id, go to Products > Tour Categories, on the right click Edit under the needed category, now check your browser url address string and find argument "tag_ID", value of this argument is the category id. For example: "&tag_ID=10&" - category id is 10. - tour_category_ids_condition: IN/AND
This attribute should be used only withtour_category_idsattribute. It determines if selected tours should belong to at least one category ( whenINvalue is used ), or to all specified category ids ( whenANDvalue is specified ). Available since Data types for Adventure Tours theme plugin version 2.1.4. - attribute: slug of the product attribute that should be used to filter tours with the terms specefied by
termsparameter
Available since Data types for Adventure Tours theme plugin version 2.4.0. - terms: term slugs or term ids separated by comma
If the product attribute has been specefied byattributeparameter, buttermsparameter is empty all tours with this product attribute are displayed. Available since Data types for Adventure Tours theme plugin version 2.4.0. - terms_operator: IN/AND/NOT IN
Determines condition logic that should be applied for the values specefied withtermsattribute. Available since Data types for Adventure Tours theme plugin version 2.4.0. - tour_ids: tour IDs (if you want to show some specific tours)
To get a tour ID, go to Products > Tours and hover over the needed tour.ID: 124appears where the number is the ID - show: /featured/onsale (allows to filter tours by on sale or featured state). Available since Data types for Adventure Tours theme plugin version 2.0.0.
- number: number of tours to show
- autoplay: number of seconds for items auto sliding. Available since Data types for Adventure Tours theme plugin version 2.1.3.
- css_class: CSS class
- price_style: default/hidden
Available since Data types for Adventure Tours theme plugin version 2.5.0. - show_categories: on/off (if to display icons of categories in the bottom left of the image). Available since Data types for Adventure Tours theme plugin version 2.1.8.
- bg_url: image URL (image displays on the carousel background)
- arrow_style: light/dark (select light if the background image is dark, and dark if the background image is light)
- order: DESC/ASC (determines items ordering direction)
- orderby: date/title/name/modified/rand/comment_count/post__in/price/sales/most_popular/menu_order (determins parameter that should be used for items ordering)
Tours Grid
Since Data types for Adventure Tours theme plugin 1.1.0.
Tours Grid shortcode allows displaying tours, up to four items in one row. Instructions on how to create tours, please see here.
[tours_grid title="Deals and Discounts" title_underline="on" sub_title="Sagittis vulputate magna sagittis sagittis erat feugiat nullam cubilia amet dignissim Euismod." btn_more_text="View more" btn_more_link="/tour-category/deals-and-discounts/" price_style="highlighted" description_words_limit="7" tour_category="deals-and-discounts" tour_ids="122,117,124,111" number="4"]
Attributes
Tours Grid has the following attributes:
- title: text
- title_underline: on/off
- sub_title: text
- description_words_limit: number of words of tour description to display
- tour_category: category slug
You should use this attribute if you want to show tours from a certain category. To get the slug, go to Products > Tour Categories, on the right click Edit under the needed category, and then on the opened page copy the slug. - tour_category_ids: tour category ids separated by comma
You should use this attribute if you want to show tours from specific category or categories. To get the category id, go to Products > Tour Categories, on the right click Edit under the needed category, now check your browser url address string and find argument "tag_ID", value of this argument is the category id. For example: "&tag_ID=10&" - category id is 10. - tour_category_ids_condition: IN/AND
This attribute should be used only withtour_category_idsattribute. It determines if selected tours should belong to at least one category ( whenINvalue is used ), or to all specified category ids ( whenANDvalue is specified ). Available since Data types for Adventure Tours theme plugin version 2.1.4. - attribute: slug of the product attribute that should be used to filter tours with the terms specefied by
termsparameter
Available since Data types for Adventure Tours theme plugin version 2.4.0. - terms: term slugs or term ids separated by comma
If the product attribute has been specefied byattributeparameter, buttermsparameter is empty all tours with this product attribute are displayed. Available since Data types for Adventure Tours theme plugin version 2.4.0. - terms_operator: IN/AND/NOT IN
Determines condition logic that should be applied for the values specefied withtermsattribute. Available since Data types for Adventure Tours theme plugin version 2.4.0. - tour_ids: tour IDs (if you want to show some specific tours)
To get a tour ID, go to Products > Tours and hover over the needed tour.ID: 124appears where the number is the ID. - show: /featured/onsale (allows to filter tours by on sale or featured state). Available since Data types for Adventure Tours theme plugin version 2.0.0.
- number: number of tours to show
- columns: number of items in 1 row ( if ommitted and number is less than 4 - number will be used, if number more than 4 - 4 items per row will be rendered). Available since Data types for Adventure Tours theme plugin version 1.1.3.
- css_class: CSS class
- price_style: default/highlighted/hidden
If default is selected, then the price shows in the bottom right of the image, if highlighted is selected, then the price appears in a colored circle in the upper right of the image. hidden option is vailable since Data types for Adventure Tours theme plugin version 2.5.0. - show_categories: on/off (if to display icons of categories in the bottom left of the image)
- btn_more_text: text (title of the button that links to some page, e.g. a tour category)
- btn_more_link: URL (URL of some page, e.g. a tour category)
- order: DESC/ASC (determines items ordering direction)
- orderby: date/title/name/modified/rand/comment_count/post__in/price/sales/most_popular/menu_order (determins parameter that should be used for items ordering)
Tours List
Note: before Data types for Adventure Tours theme plugin version 1.1.0 we have shortcode [tour_list] that displays tours in a "grid" mode. Now we have 2 shortcodes: [tours_list] and [tours_grid]. For backward compability we left shortcode [tour_list] as it was before, but we will remove it in future. Please replace [tour_list] shortcode with [tours_grid] (arguments are same, so all you should just replace name of the shortcode).
Tours List shortcode allows displaying tours, in list style. Instructions on how to create tours, please see here.
[tours_list title="Deals and Discounts" title_underline="on" sub_title="Sagittis vulputate magna sagittis sagittis erat feugiat nullam cubilia amet dignissim Euismod." btn_more_text="View more" btn_more_link="/tour-category/deals-and-discounts/" price_style="highlighted" description_words_limit="7" tour_category="deals-and-discounts" tour_ids="122,117,124,111" number="4"]
Attributes
Tours List has the following attributes:
- title: text
- title_underline: on/off
- sub_title: text
- description_words_limit: number of words of tour description to display
- tour_category: category slug
You should use this attribute if you want to show tours from a certain category. To get the slug, go to Products > Tour Categories, on the right click Edit under the needed category, and then on the opened page copy the slug. - tour_category_ids: tour category ids separated by comma
You should use this attribute if you want to show tours from specific category or categories. To get the category id, go to Products > Tour Categories, on the right click Edit under the needed category, now check your browser url address string and find argument "tag_ID", value of this argument is the category id. For example: "&tag_ID=10&" - category id is 10. - tour_category_ids_condition: IN/AND
This attribute should be used only withtour_category_idsattribute. It determines if selected tours should belong to at least one category ( whenINvalue is used ), or to all specified category ids ( whenANDvalue is specified ). Available since Data types for Adventure Tours theme plugin version 2.1.4. - attribute: slug of the product attribute that should be used to filter tours with the terms specefied by
termsparameter
Available since Data types for Adventure Tours theme plugin version 2.4.0. - terms: term slugs or term ids separated by comma
If the product attribute has been specefied byattributeparameter, buttermsparameter is empty all tours with this product attribute are displayed. Available since Data types for Adventure Tours theme plugin version 2.4.0. - terms_operator: IN/AND/NOT IN
Determines condition logic that should be applied for the values specefied withtermsattribute. Available since Data types for Adventure Tours theme plugin version 2.4.0. - tour_ids: tour IDs (if you want to show some specific tours)
To get a tour ID, go to Products > Tours and hover over the needed tour.ID: 124appears where the number is the ID. - show: /featured/onsale (allows to filter tours by on sale or featured state). Available since Data types for Adventure Tours theme plugin version 2.0.0.
- number: number of tours to show
- css_class: CSS class
- price_style: default/hidden
Available since Data types for Adventure Tours theme plugin version 2.5.0. - show_categories: on/off (if to display icons of categories in the bottom left of the image)
- btn_more_text: text (title of the button that links to some page, e.g. a tour category)
- btn_more_link: URL (URL of some page, e.g. a tour category)
- order: DESC/ASC (determines items ordering direction)
- orderby: date/title/name/modified/rand/comment_count/post__in/price/sales/most_popular/menu_order (determins parameter that should be used for items ordering)
Tour Reviews
Tour Reviews shortcode allows displaying tour reviews sorted from the latest to the oldest.
[tour_reviews title="Tour Reviews" title_underline="on" number="2"]
Attributes
Tour Reviews has the following attributes:
- title: text
- title_underline: on/off
- tour_id: tour ID (if you want to show reviews related to some specific item only)
To get a tour ID, go to Products > Tours and hover over the needed tour.ID: 124appears where the number is the ID. Available since Data types for Adventure Tours theme plugin version 2.1.9. Since Data types for Adventure Tours theme plugin version 2.2.8 few values separeted by comma can be used as well. - words_limit: number of words from the post to display. Available since Data types for Adventure Tours theme plugin version 2.1.3.
- number: number of reviews to show
- css_class: CSS class
Contact Info
Contact Info shortcode allows displaying contact information with icons for address, email, phone, and Skype.
[contact_info address="777 Franklin St, San Francisco" phone="+1 420-240-6000" mobile="+1 800-240-6000|+1 800-240-6001" email="contact@adventuretours.com" skype="adventure.tours"]
Attributes
Contact Info has the following attributes:
- address: text
- phone: text
- mobile: text. Available since Data types for Adventure Tours theme plugin version 2.1.1.
- email: text
- skype: text
- css_class: CSS class. Available since Data types for Adventure Tours theme plugin version 1.2.0.
Since Available since Data types for Adventure Tours theme plugin version 2.1.1 you able add few phone number, mobile numbers, email addresses and skyp usernames separated by "|" character.
Social Icons
Social Icons shortcode allows displaying icons with your custom links to different social services.
[social_icons title="" facebook_url="http://facebook.com" twitter_url="http://twitter.com" pinterest_url="http://pinterest.com" linkedin_url="http://linkedin.com"]
Attributes
Social Icons has the following attributes:
- title: text
- open_url_in_new_tab: off/on, determines if urls should be opened in a new tab, or in a same one. Available since Data types for Adventure Tours theme plugin version 2.5.3.
- facebook_url: URL to your Facebook profile
- twitter_url: URL to your Twitter profile
- youtube_url: URL to your YouTube profile. Available since Data types for Adventure Tours theme plugin version 1.2.6.
- pinterest_url: URL to your Pinterest profile
- linkedin_url: URL to your LinkedIn profile
- instagram_url: URL to your Instagram profile
- dribbble_url: URL to your Dribbble profile
- tumblr_url: URL to your Tumblr profile
- vk_url: URL to your VK profile. Available since Data types for Adventure Tours theme plugin version 1.0.2.
- tripadvisor_url: URL to your TripAdvisor profile. Available since Data types for Adventure Tours theme plugin version 2.1.2.
- css_class: CSS class. Available since Data types for Adventure Tours theme plugin version 1.2.0.
Mailchimp Form
Mailchimp Form shortcode allows inserting a subscription box based on Mailchimp service. Note that you should have MC4WP: Mailchimp for WordPress to use this shortcode.
[mailchimp_form mc4wp_form_id="1" title="Join the Newsletter" width_mode="full-width" bg_repeat="repeat" css_class="stick-to-bottom" bg_url="http://adventure-tours.themedelight.com/wp-content/uploads/2015/07/mountain-river.jpg"]To receive our best monthly deals[/mailchimp_form]
Attributes
Mailchimp Form has the following attributes:
- mc4wp_form_id (required): form ID
You should get the Form ID created with MC4WP: Mailchimp for WordPress plugin. Available since Data types for Adventure Tours theme plugin version 2.7.0. - title: text
- content: text (displayed under title)
- css_class: CSS class
- width_mode: box-width/full-width (whether to stretch the form to full width or display within the container width)
- bg_url: image URL (image displays on the form background)
- bg_repeat: repeat/no-repeat/repeat-x/repeat-y (whether and how to repeat the image)
Google Map
Google Map shortcode displays Google map with coordinates that you indicate.
[google_map coordinates="37.7919688,-122.4243583" zoom="10" height="400" width_mode="full-width" css_class="stick-to-bottom"]
Attributes
Google Map has the following attributes:
- address: text (shows up when clicking on the map marker)
- coordinates (required): two decimal numbers, separated with a comma
To get coordinates, go to Google Maps and search for your needed address. In the URL look for a piece formatted like this:@37.7577,-122.4376,. The numbers between@and,are the coordinates. - zoom (required): number from 1 to 21
- height: number (the height of map in pixels)
- width_mode: box-width/full-width (whether to stretch the map to full width or display within the container width)
- css_class: CSS class
NOTE: according to Google Maps API, you should use your own uniquer API key to be able to use Google Maps service on your site. You can configure your API key in Appearance > Theme Options > General section, Google Map API Key option that available since theme version 2.2.9. To create Google Map API key, please check this article.
Google Map Embed
Since Data types for Adventure Tours theme plugin 2.1.0.
Allows insert custom google maps as embed element ( for more details please check this link ).
[google_map_embed src="https://www.google.com/maps/d/u/0/embed?mid=SOMEIDGOESHERE" height="450"]
Attributes
- src: url for embed map
- height: element height, in pixels
- css_class: CSS class
Latest Posts
Latest Posts shortcode displays latest blog posts.
[latest_posts title="Latest Post" title_underline="on" number="1" read_more_text="Read more" words_limit="25"]
Attributes
Latest Posts has the following attributes:
- title: text
- title_underline: on/off
- category: category slug
You should use this attribute if you want to show posts from a certain category. To get the slug, go to Posts > Categories, on the right click Edit under the needed category, and then on the opened page copy the slug. - post_ids: post IDs (if you want to show some specific posts)
You may check this article that explains how to get post ID of particular item in Wordpress. - number: number of posts to display
- read_more_text: text
- words_limit: number of words from the post to display
- css_class: CSS class. Available since Data types for Adventure Tours theme plugin version 1.2.0.
Timeline
Timeline shortcode allows placing content into blocks with numbers in timeline nodes. Timeline helps nicely group activities, events, or any other items into an ordered list.
[timeline][timeline_item item_number="1" title="Day 1"]Lorem ipsum 1[/timeline_item][timeline_item item_number="2" title="Day 2"]Lorem ipsum 2[/timeline_item][/timeline]
Attributes
Timeline_item has the following attributes:
- item_number: number
- title: text
Icons Set
Icons Set shortcode is a table with icons and text in its cells.
[icons_set row_size="3"][icon_item icon="td-earth" title="Item1"] [icon_item icon="td-heart" title="Item2"] [icon_item icon="td-lifebuoy" title="Item3"][/icons_set]
Attributes
Icons_set has the following attributes:
- row_size: number of columns
- css_class: CSS class. Available since Data types for Adventure Tours theme plugin version 1.2.0.
Icon_item has the following attributes:
- icon: icon class
To select an icon, open this file and copy an icon CSS class next to the icon image. - title: text
- title_url: target url address applied for icon and title elements. Available since Data types for Adventure Tours theme plugin version 2.1.7.
- open_url_in_new_tab: on/off, determines if title_url address should be opened in a new tab, or in a same one. Available since Data types for Adventure Tours theme plugin version 2.2.5.
Number of rows is detected automatically, based on the number of icon items that you place into the icon set.
Products Carousel
Since Data types for Adventure Tours theme plugin 1.1.0.
Products Carousel shortcode allows placing a carousel of products. If there is three or less items, then the carousel navigation arrows won't show.
[product_carousel title="Most Popular Tours" title_underline="off" sub_title="Take a Look at Our" description_words_limit="7" product_ids="114,132,128,134,126" bg_url="http://adventure-tours.themedelight.com/wp-content/uploads/2015/07/most-popular-bg.jpg" arrow_style="light"]
Attributes
Products Carousel has the following attributes:
- title: text
- title_underline: on/off
- sub_title: text
- description_words_limit: number of words of tour description to display
- product_category_ids: product category ids separated by comma
You should use this attribute if you want to show tours from specific category or categories. To get the category id, go to Products > Categories, on the right click Edit under the needed category, now check your browser url address string and find argument "tag_ID", value of this argument is the category id. For example: "&tag_ID=10&" - category id is 10. - product_category: category slug
You should use this attribute if you want to show tours from a certain category. To get the slug, go to Products > Categories, on the right click Edit under the needed category, and then on the opened page copy the slug. - product_ids: product IDs (if you want to show some specific products)
To get a product ID, go to Products > Products and hover over the needed tour.ID: 124appears where the number is the ID. - number: number of tours to show
- autoplay: number of seconds for items auto sliding. Available since Data types for Adventure Tours theme plugin version 2.1.3.
- css_class: CSS class
- bg_url: image URL (image displays on the carousel background)
- arrow_style: light/dark (select light if the background image is dark, and dark if the background image is light)
- order: DESC/ASC (determines items ordering direction)
- orderby: date/title/name/modified/rand/comment_count/post__in/price/sales/most_popular/menu_order (determins parameter that should be used for items ordering)
Accordion
Since Data types for Adventure Tours theme plugin 1.2.0.
[accordion style="with-shadow"]
    [accordion_item title="Title 1"]Lorem ipsum 1[/accordion_item]
    [accordion_item title="Title 2" is_active="on"]Lorem ipsum 2[/accordion_item]
    [accordion_item title="Title 3" css_class="special-item"]Lorem ipsum 3[/accordion_item]
[/accordion]
Attributes
Accordion has the following attributes:
- style:with-shadow/with-border
- css_class: CSS class
Tabs
Since Data types for Adventure Tours theme plugin 1.2.0.
[tabs]
    [tab_item title="Title 1"]Lorem ipsum 1[/tab_item]
    [tab_item title="Title 2" is_active="on"]Lorem ipsum 2[/tab_item]
    [tab_item title="Title 3"]Lorem ipsum 3[/tab_item]
[/tabs]
Attributes
Tabs has the following attributes:
- style:with-shadow/with-border
- css_class: CSS class
Plugins
To use the tours functionality, it is a requirement to install Data types for Adventure Tours theme and WooCommerce plugins. Slider Revolution, Contact Form 7, and Mailchimp are recommended plugins but are not required to run the theme.
Data types for Adventure Tours theme
NOTE: Plugin integrated into the theme archive. Located in the theme archive file at
adventure-tours/vendor/plugins/adventure-tours-data-types.zip.
This plugin is provided with the theme and it implements the following functionalities:
- defines all shortcodes related to the theme;
- defines Tour Category taxonomy;
- defines FAQ post type and FAQ Category taxonomy that are required for the FAQs page;
- defines Media Category taxonomy for attachments that allow creating filters in the image galleries.
WooCommerce
The documentation on how to use the plugin, see here.
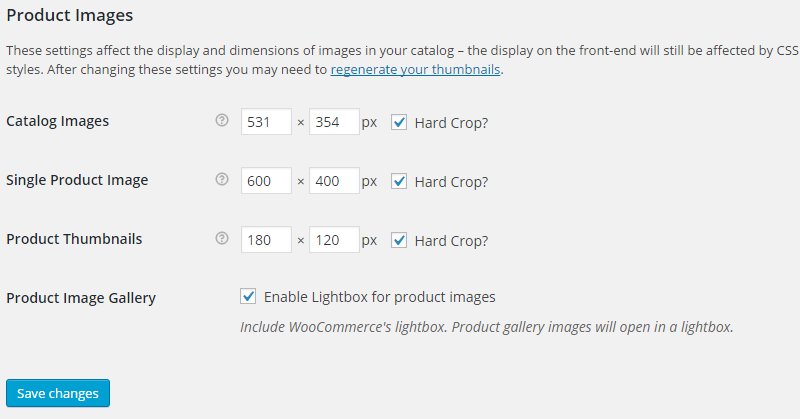
After you install the plugin, please go to Appearance > Customize > WooCommerce > Product Images section, choose Thumbnail cropping option to Custom and assign aspect ratio to 6:4. Press Publish button to apply your changes to the site.
NOTE: If your WooCommerce version is below 3.3.0 please follow with instructions provided here
WPBakery Page Builder (Visual Composer)
NOTE: Available since Data types for Adventure Tours theme plugin version 2.0.0.
Detailed documentation on how to use the plugin can be found at WPBakery Page Builder official website. To install plugin please follow instructions provided here.
Slider Revolution
Detailed documentation on how to use the plugin can be found at Slider Revolution official website. If you have not installed Slider Revolution yet, follow the instructions here.
NOTE: we are providing Slider Revolution plugin with our theme based on Extended license. This type of license allows using this plugin in our theme and providing our clients with possibility to use the plugin with some restrictions. For example, you can't update plugin directly from the supplier, only from our theme and you can't get premium support from Themepunch team. If you need something from this, you should purchase a personal license from Themepunch and activate your license in Slider Revolution settings. To get more information about licenses please check this page.
To create a video slider like the one used in our live demo, follow the steps below:
- Go to Revolution Slider > Revolution Slider and click on Import Slider. Choose
Sample Data/home-revo-slider.zipfrom your extracted package and press Import Slider. - Under Revolution Sliders, hover over the newly created Home slider thumbnail and click on the pencil icon.
- Scroll the page to the Main Background section. Under HTML5 Video, change videos and a cover image to your own files. Then go to the layers area and update the title, subtitle, and the button. (When you click on the needed layer, four little icons will appear. Click on the most left "A" icon. When you complete updating the layer, click on the green tick icon to save.)
- Click on the green save icon that is attached to the right side of the screen. Now the slider is ready.
- To display this slider on home page you should go to Pages section, open your home page for edition. Under main content text area you should be able to find Header Section panel, switch Display Mode to Slider there, choose your slider in provided selectbox and save you changes. After this you slider should be displayed on your home page.
Contact Form 7
If you have not installed Contact Form 7 yet, follow the instructions here.
To create a contact form like the one used in our live demo, follow the steps below:
- Go to Contact > Add New and press Add New button. Copy the contents of this file and paste it into the text area.
- Press Save.
Now you can use the form on any page or post of your site. Just go to Contact > Contact Forms, copy the shortcode next to the form title, and paste it into the page or post body.
MC4WP: Mailchimp for WordPress
If you have not installed the plugin yet, follow the instructions here.
To create a Mailchimp form like the one used in our live demo, follow the steps below:
- Go to MC4WP > Mailchimp and enter your Mailchimp API key. Press Save Changes button.
- Go to MC4WP > Form and create the form.
- Use created form id as a value for mc4wp_form_id parameter of Mailchimp Form shortcode.
Customize Theme
In order to customize theme colors and typography, go to Appearance > Customizer. In the left sidebar there are options for editing. The changes can be previewed as soon as they are made.
You can also add your own CSS styles at Appearance > Theme Options > General > Custom CSS.
Child Theme
Note: to understand the current section, you should have basic knowledge of CSS and HTML. It is also desirable to have basic understanding of WordPress theme development.
If there are too many style changes or if you also plan to change some HTML, we recommend to create a child theme and make customizations there. It is a requirement to use the child theme if you want to keep the theme updated as well as preserve your customizations. If you are modifying Adventure Tours files, you should not make theme updates.
To implment a child theme for your website you should install and activate achild theme from our full package archive as explained here. After this you can add your customization CSS rules to adventure-tours-child/style.css file, via Appearance > Editor section, as well as redefine theme templates in the child theme folder. (Copy a template file from Adventure Tours to the child theme and customize it.) You can familiarize yourself with child themes here.
Custom Shortcode Templates
All shortcode templates are located in the folder adventure-tours/templates/shortcodes. The name of the file is equal to the shortcode name. For example, the [title] shortcode template is located at adventure-tours/templates/shortcodes/title.php. You can modify shortcode templates as well as create new ones and use them to your needs.
For example, to modify [contact_info] shortcode, do the following:
- Copy the file
adventure-tours/templates/shortcodes/title.phptoadventure-tours-child/templates/shortcodes/title.php - Modify the shortcode as you prefer and save it.
Translate Theme
You can either install WPML plugin to translate the theme, or you can follow steps described below to create own theme translation file to translate, or override some text defined in theme view files..
For example, you want your site to be in French. So your locale name will be fr and in file names below fr_FR suffix depends on the language translation for that you are going to create..
- Copy the file located at
/wp-content/themes/adventure-tours/languages/adventure-tours.potto/wp-content/languages/themes/adventure-tours-fr_FR.po. - Download and install the program called POEdit.
- Open the copied file
/wp-content/languages/themes/adventure-tours-fr_FR.powith POEdit program. - Start translating. When you are finished, save the file and check that the file
/wp-content/languages/themes/adventure-tours-fr_FR.mohas been generated. - Go to Settings > General and scroll to the bottom, select Français from the Site Languages dropdown, press Save Changes.
Now you should have your theme translated into your language!
Troubleshooting
If you don't see your changes on the site, please check following:
- check that you uploaded your files to
/wp-content/languages/themes/folder and not to/wp-content/themes/adventure-tours/languages/folder; - check that you file has correct name like
adventure-tours-{fr_FR}.poandadventure-tours-{fr_FR}.mo. {fr_FR} ("{" and "}" symbols just to show part that should be corrected for your case ). This suffix depends on the language that selected in Settings > General section in Site Languages option. So please check what language selected in this option and what file name suffix is used for your files.
Theme Updates
To be notified of new theme updates, you should turn on Update Notifier button at Appearance > Theme Options > General (is enabled by default).

There are two locations on the website where you can see that there is a new version of Adventure Tours available:
- on top Admin toolbar

- at Admin panel > Appearances > Adventure Tours
This section contains information about updates that are available in the new version. You can see the changelog of versions at item details page, as well.
NOTE: If you did not make any changes in Adventure Tours theme files and in Data types for Adventure Tours theme plugin files, you should follow the instructions below. Otherwise, you will lose all your changes during this update process.
Since Wordpress does not provide any API to update theme automatically (automatic updates are available for themes published on wordpress.org only), the theme update process requires a few additional steps from your side.
We recommend to use Envato Market plugin, or Envato WordPress Toolkit plugin to update Adventure Tours theme. This plugins allow to updating your theme in a truly handy way. Please check this guide, on how to install Envato Market plugin, or this one, on how to install Envato WordPress Toolkit plugin. Use one of these plugins to update themes purchased from Envato instead of manual theme update process (replacing theme files via ftp, sftp, or control panel file manager).
NOTE: Theme update with Envato WordPress Toolkit plugin up to version 2.2.6 may fail. To avoid this issue, please check this topic
Also, please take in consideration that Adventure Tours theme is provided with the following built-in plugins:
- Data types for Adventure Tours theme;
- Slider Revolution;
- WPBakery Page Builder.
Updates for these plugins are distributed with the theme only ( if you don't have a personal license for Slider Revolution or WPBakery Page Builder plugins, of course ). If some of these plugins are updated, you will see a notice about that in your admin's panel, but you will be able to update it only after next theme release. After theme that contains fresh plugin(s) version is installed to your website go to Appearance > Install Plugins section and update the appropriate plugin(s).
Information about these plugins' updates are available in the theme changelog as well.
WooCommerce outdated view files
From time to time, WooCommerce releases changes in its own template files.. Some of these template files are overwritten by Adventure Tours theme. WooCommerce checks if any of your themes, or plugins use older version of these templates as the "base version" that current WooCommerce view files and if any "otdated" view files are detected notice you about that to prevent your attention to this fact, as it has potential to create compatibility issues. We are monitoring such cases and if there are any signifacnt changes are released (changes that may create any issue for the system) we are releasing new theme update with "actualized" view files. Usually is takes 1-2 days after WooCommerce release. So to avoid thsese notice(s) you should just update the theme after WooCommerce update.
Please note as well, that sometimes changes in WooCommerce view files have no impact on the system functionality at all (changes that does not alter logic, or presentation in any way), but they still is a reason for notice(s) described above. In such cases theme update may be released later, as making theme release witout any valuable changes has no sense.
If you are overrode some WooCommerce view files in the child theme you should take care about "actualization" of these view files by yourself.
Update notices
Update from 1.X to 2.X
After updating Adventure Tours from version 1.x to version 2.x, you can start using WPBakery Page Builder plugin. In order for the plugin to work properly, there is need to update some shortcodes, such as "row" to "vc-row" or "column" to "vc-column". We've created a special tool for this task. When you open a page, a blog post or any other content for editing, please pay attention at the top notice that displayed on image below:

To convert shortcodes automatically, press the button convert button and after that check that all your shortcodes were converted properly without any loss.
Please keep additional attention to posts that contains html tags.
FAQs
General
Q: How to change the typography?
A: To change the typography, go to Appearance > Customize and in the left sidebar click Typography. Now you can set up your typography.
Q: How to change theme colors?
A: To change theme colors, go to Appearance > Customize and in the left sidebar there are General Colors, Header Colors, and Footer Colors to set up. You can also set up colors for tour badges at Appearance > Theme Options > Tours > Tour Badges.
Q: How to implement child theme?
A: You should install the child theme from adventure-tours-child.zip (provided in the full package archive) and activate it in Admin Panel > Apperance > Themes section. After that you can sutomize your child theme without changing original one. This needed to have possiblity to update Adventure Tours in future without losing your fixes. For example, you can copy a template file from Adventure Tours to your child theme and make adjustments there. You can familiarize yourself with child themes more here.
Tours
Q: Where is tours search page?
A: Tours search page is the same as tours page. Instructions on how to create tours page, see here.
Q: How to add a badge to a tour?
A: Instructions on how to create and add badges, see here.
Q: How to add attributes to a tour?
A: Instructions on how to add attributes to a tour, see here.
Q: How to add additional tabs to the tour details page?
A: Go to the tour editing page and in the Tour Data box, add tabs with content.
Q: How to create a tour gallery?
A: Go to the tour editing page and on the right in the Product Gallery box, add photos.
Q: How to create a tour timeline?
A: To create a tour timeline, you should use [timeline] shortcode. For more information, see here.
Q: How to set up a tour search form?
A: Instructions on how to set up a tour search form, see here.
Q: How to change the title of the tour booking form?
A: To change the title of the tour booking form, you should use adventure_tours_booking_form_title filter in your child theme.
For example, you can add the following code to the child theme functions.php file:
function filter_adventure_tours_booking_form_title( $title, $tour ) {
    $custom_title = get_post_meta( $tour->get_id(), 'tour_booking_form_title', true );
    return $custom_title ? $custom_title : $title;
}
add_filter( 'adventure_tours_booking_form_title', 'filter_adventure_tours_booking_form_title', 10, 2);
The code above checks if a tour (passed via $tour argument) has value for tour_booking_form_title meta field and uses it as a title value if it is not empty. So after this filter has been added to your child theme, you are able to add the meta field with the name tour_booking_form_title to customize the booking form title for each tour. On how to manage custom fields, see here.
Q: How to change the submit button text of the tour booking form?
A: Please use the filter adventure_tours_booking_form_btn_text and follow the instructions from the above question. Please don't forget to replace tour_booking_form_title with a different name for the meta field.
Q: Tour reviews do not appear.
A: Before a review appears, admin should approve it on the tour editing page in the Reviews box or at Comments section of admin panel. To modify comment settings, go to Settings > Discussion.
Other
Q: How to create a Contact page?
A: Instructions on how to create a Contact page, see here.
Q: How to create a Gallery page?
A: Instructions on how to create a Gallery page, see here.
Q: How to create a FAQs page?
A: Instructions on how to create a FAQs page, see here.
Q: Where is Blog page?
A: First, you need to create a blog page at Pages > Add New. Enter "Blog" as page title and press Publish. After that, go to Settings > Reading and in the drop-down Posts page select Blog. Press Save Changes.
Q: Where is Shop page?
A: The Shop page is created when you install WooCommerce plugin. The page can be found at Pages > All Pages.
Q: How to add products?
A: Instructions on how to add products, see here.
Q: How to replace some words and sentences in the theme?
A: Please use the translation files to replace the words. Don't be confused by the word "translation" if you need just the replacement and not really the translation, e.g. English to English. Translation is just an instrument for this task, you can follow the instructions here.
Q: How to update my Easy MailChimp Forms from version 5.X to 6.X?
A: Prior to theme version 1.0.6, Adventure Tours theme supported only version 5.X of Easy MailChimp Forms plugin. Since the theme version 1.0.6, support for plugin version 6.X is added. So if you are using Easy MailChimp Forms plugin, we strongly recommend you to update the plugin to version 6.X. To do this, follow the steps below:
- Make sure that you've updated Adventure Tours theme up to version 1.0.6 or above.
- Make sure that you've updated Data types for Adventure Tours theme up to version 1.0.4 or above.
- Update Easy MailChimp Forms plugin.
- Deactivate and activate this plugin (this step is required to complete the migration process).
- Go to Easy Forms > Settings and enter your MailChimp API key again.
- Go to Easy Forms > Opt-in Forms and create a subscription form for all the lists that you used before.
- Update all places (pages/widgets) where you use [mailchimp_form] shortcode. Your code looks like this:
[mailchimp_form mailchimp_list_id="123123123" button_text="Subscribe" title="Join the Newsletter" ...]To receive our best monthly deals[/mailchimp_form]
Remove "mailchimp_list_id" attribute (has been replaced with new one) and add "form_id" attribute with your new form ID as the attribute's value. Now it should look like this:
[mailchimp_form form_id="1" button_text="Subscribe" title="Join the Newsletter" ...]To receive our best monthly deals[/mailchimp_form]
Please check that all of your forms work correctly after migration.
Q: How to avoid error "File name too long..." during updating process with Envato WordPress Toolkit plugin?
A: This error may occur if your current theme version is 2.2.5 or below, so in order to avoid it, you should:
- install and activate child theme provided with our full package archive, if you don't use it yet;
- add following code to child theme
functions.phpfile ( full path will look like thiswp-content/themes/adventure-tours-child/functions.php):
if ( ! function_exists( 'adventure_tours_filter_upgrader_package_options' ) ) {
    function adventure_tours_filter_upgrader_package_options( $options ){
        if ( !empty( $options['hook_extra']['theme'] ) && 'adventure-tours' == $options['hook_extra']['theme'] ) {
            $package = !empty( $options['package'] ) ? $options['package'] : '';
            if ( $package && preg_match( '`^(http|https|ftp)://`i', $package ) && ! file_exists( $package ) ) {
                // downloads update package to resolve issue with long name generated by `wp_tempnam` in `download_url` function
                $tmpfname = wp_tempnam();
                if ( $tmpfname ) {
                    $response = wp_safe_remote_get( $package, array(
                        'timeout' => 300,
                        'stream' => true,
                        'filename' => $tmpfname
                    ) );

                    if ( is_wp_error( $response ) || 200 != wp_remote_retrieve_response_code( $response ) ) {
                        unlink( $tmpfname );
                    } else {
                        $content_md5 = wp_remote_retrieve_header( $response, 'content-md5' );
                        if ( $content_md5 ) {
                            $md5_check = verify_file_md5( $tmpfname, $content_md5 );
                            if ( is_wp_error( $md5_check ) ) {
                                unlink( $tmpfname );
                            }
                        }

                        if ( file_exists($tmpfname) ) {
                            $options['package'] = $tmpfname;
                        }
                    }
                }
            }
        }
        return $options;
    }
    add_filter( 'upgrader_package_options', 'adventure_tours_filter_upgrader_package_options' );
}
- update Adventure Tours theme via Envato Toolkit plugin;
- now you can remvove this code from your child theme functions.php file, as since version 2.2.6 this fix included into theme itself ( or if you installed child theme only to apply this fix - you may just remove your child theme now, but BE SURE that you don't have any other customization there, as in this case you will have any option to restore them back! ).
Support
We provide support for Adventure Tours theme. Please feel free to contact us in case you have any questions or if you would like to make a suggestion. We care about each of our customer and would like to help as much as we can.
Please send us a message via ThemeForest email box so that we know your purchase code.